Page 1 of 3
Newbee build
Posted: Thu Oct 28, 2010 2:04 pm
by bigcatdaddy
Been thinking about a .204 build ever since my last PD trip to Roundup, MT. Friends had gone to AR varmint rigs and quit using their bolt actions. At least to 250-300 yds, their accuracy was amazing. What really grabbed me was the lack of recoil, ability to auto-chamber next rd for quick followup on misses, and even better retention of sight picture than my bolt-action Savage .204.
Decided this winter I would try to put together a rig. I was considering documenting it here as I go. This is my first AR build and after several weeks I'm ready to dive in.
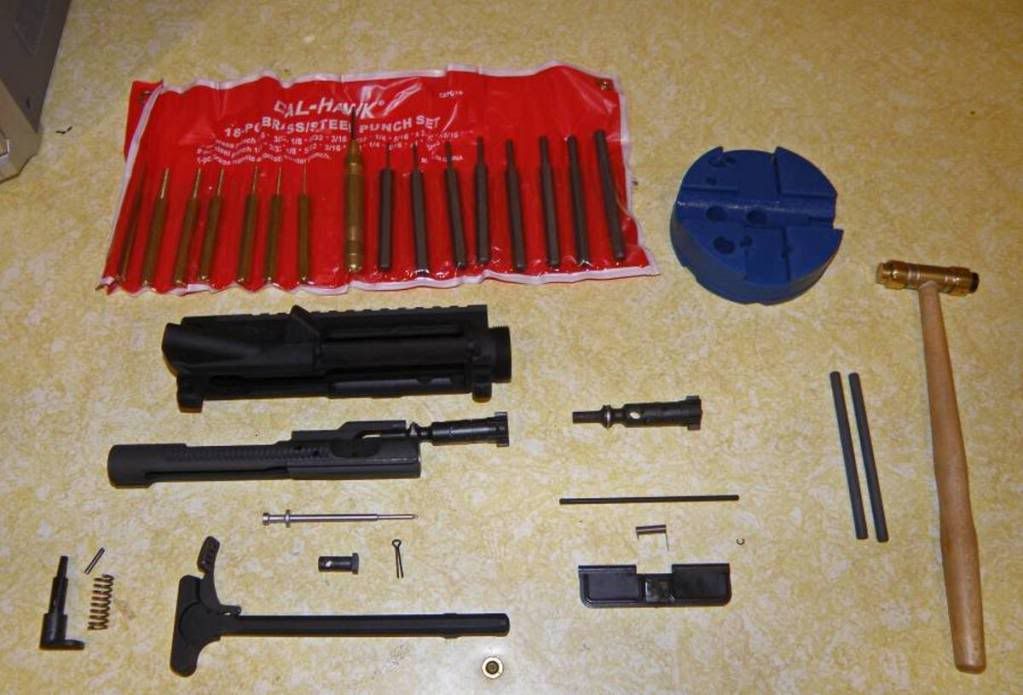
Parts and tools...I had none, bought them all online
Picked up Shilen barrel and bolt, DPMS A3 upper, Yankee Hill lower, DPMS stock kit.
Was planning on diving in this weekend. Will be planning on posting a few pics as it progresses along. Thought it might help other newbs as I encounter success and frustration.
Hoping for a rig that can hold at least 2" at 300 yds. That would be my definition of success.
Feel free to come along....
Re: Newbee build
Posted: Fri Oct 29, 2010 2:05 am
by TXNinVA
Post pics. 1st build... sure you have everything?
Re: Newbee build
Posted: Sat Oct 30, 2010 12:54 pm
by bigcatdaddy
Pros...Very easy conceptualy to put this together. Quite quick as well.
Cons...you do need some specialized tools, armorers block, AR vise/clamp, punches, brass hammer, AR wrench. That was a few extra bucks.
Problems encountered:
1) I had a "teardrop" forward assist. Which way is up? After envisioning it's function I placed it and set the pin. Later I questioned myself. It didn't seem to engage the bolt-carrier. I smacked the pin back out and flipped it. Now the bolt-carrier can not disengage it. I smacked the pin out and flipped it back.
2) The dang c-clip for the ejector-port rod. I did not loose it. Seemed to push onto the rod groove way too easily. My vision is not eagle-like and I decided it needed a good smack. Hit it good with hammer...but now it falls off the rod. A magnified inspection showes I broke off the litle ears in the inner clip that "grab" the rod. Bought some "e" clips at the hardware store...didn't like 'em. Went back and compressed the diameter of the original clip. Seems to hold on the rod loosely now.
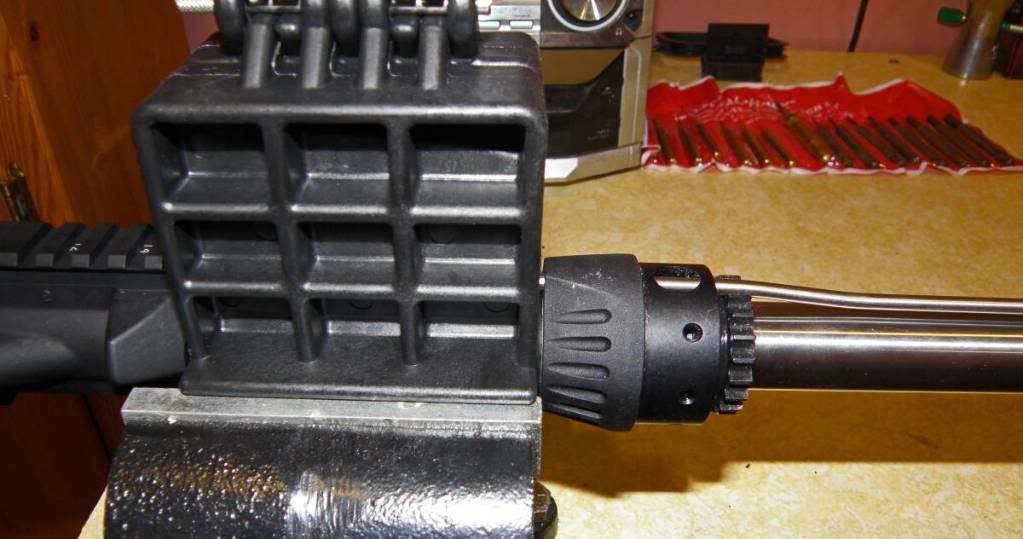
3) Midway USA says you can "set the threads" and avoid lock-tight on the outer barrel nut/inner retaing nut threads. They describe the procedure in their publication...."Building the Ultimate AR Varmint Upper". Well, as you tighten the inner barrel retaining nut, it is a magic trick to keep the outer nut from spinning, obtaing the proper torque when setting the retaining nut, and still have all the gas portals aligned. After I grew a third hand...it was accomplished. Wondering now if I will be happy or have to go back and apply locktight in the future?
4) Gas block and the barrel where it rides both needed sanding (to slide through each other)...very slight, to mate up...used 600 grit. Nice tight fit. I wonder how tight the tolerance is for the gas hole on tube, and gas hole in block interior to align? There is no way to tell other than to push the gas block onto barrel until it hits the stop and "eyeball" that the gas tube seems to be riding dead-center at 12 o'clock after the gas tube pin is placed.
5) Purchased a JP Enterprises full length free-float aluminum handguard. It's missing the 7 topside "plug screws".
(ADDENDUM...Midway called JP Enterprises for me. JP says they have quit including the 7 "plug screws"....jeesh, for $170, you think you could get $2.00 worth of parts. Guess another trip to the hardware store is in order).
Roll-pin punches were very helpful. Brass punches were not....way too soft. Pins just tore them apart. Careful use of the steel punches and brass hammer did the trick. Perhaps the low-end punch set I bought?
Re: Newbee build
Posted: Sat Oct 30, 2010 1:06 pm
by bigcatdaddy
DPMS parts except for a Badger charging handle with larger release handle.
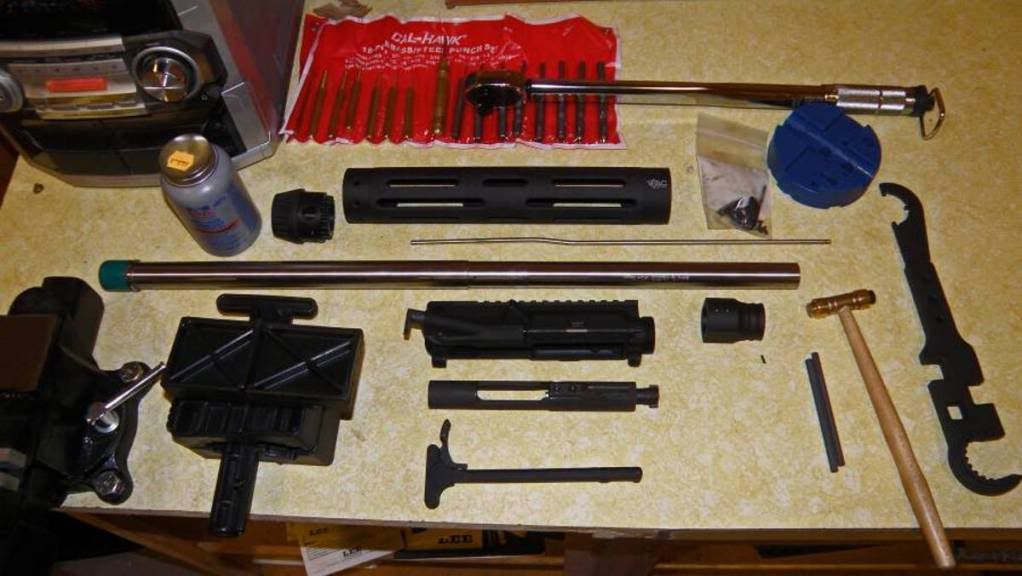
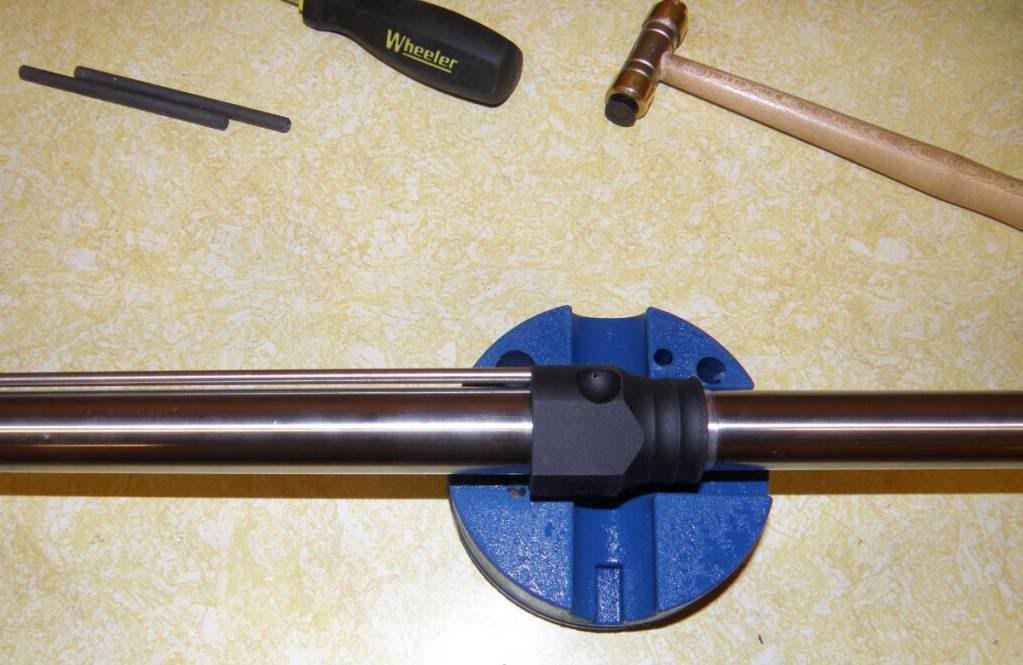
after the bolt carrier and Receiver assembled...starting the barrel assembly. Shilen match-grade barrel and matching bolt.
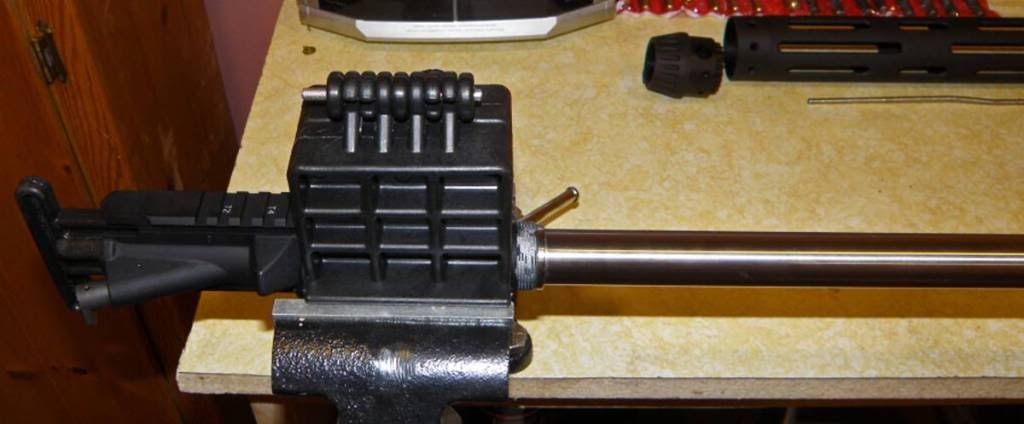
closeup of the barrel clamp/vise and receiver threads with anti-sieze
Re: Newbee build
Posted: Sat Oct 30, 2010 1:10 pm
by bigcatdaddy
Finaly! Success!
But I mucked up the finish slightly as I tried to use my "third-hand" to hold the outer nut without locktight. Hoping I can apply something to restore the matte finish?
Gas-tube and block assembly
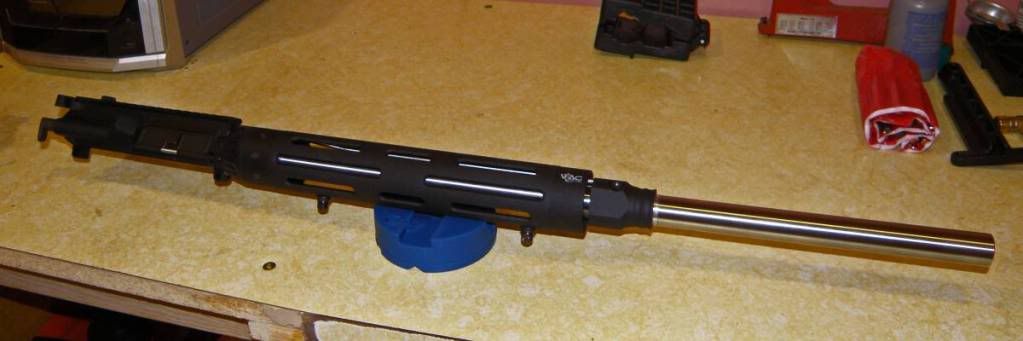
finished upper assembly
Now I start the Lower when it comes in the mail in 1-2 weeks
Anyone experienced....please feel free to comment pro or con, I have thick skin.
You know....this rig is nearly the same as my M-16 in Basic 30 years ago!
Re: Newbee build
Posted: Mon Nov 01, 2010 6:33 pm
by Valar
New to ar myself. I have exact same componenets comming to me at this time . I already have my rockriver lower assembled piece of cake.

Re: Newbee build
Posted: Thu Nov 04, 2010 11:28 am
by TXNinVA
Sorry to hear of the woes with your free float tube.
My yankee hill machine went on effortlessly. No third hand required.
Re: Newbee build
Posted: Sat Nov 06, 2010 5:11 pm
by Valar
Oh that rig pretty much is your old m 16 I beleive except 204 and semi auto? I put my lower together, I bought a stripped rock river and dpms parts kit piece of cake Let me know if you need assistance.
Re: Newbee build
Posted: Sun Nov 07, 2010 5:41 am
by bigcatdaddy
thx Valar
Just completed the lower yesterday. I found instructions and good video on the web. I really struggled with the hammer pin. I'm impressed with how many pins and springs are in a lower. Some of the placements and functions are really quite ingenious. She's together and seems to cycle!
Gotta lube her and read about "barrel-break-in". Gotta a few "idiot marks".
Re: Newbee build
Posted: Sun Nov 07, 2010 6:19 am
by Valar
I covered my lower with duct tape before assembly as much as possible. It did a nice job of protecting finish. Yes I to used a schematic and you tube video. Between the two resources, It makes it very doable for us beginners. I am waiting on my bolt carrier to get here. Should have it teusday I am going to loctite barrel nut. But I am going to use med strength loctite. The high strength requires a tourch t lossen. Let ya know how she shoots when I get her broke in. You do the same
Re: Newbee build
Posted: Sun Nov 07, 2010 6:23 pm
by TXNinVA
Pardon me fellas... but my gas tube goes through the barrel nut.
How is it going to get loose? I am not familiar with your free float tube, so excuse me if this question seems off.
Re: Newbee build
Posted: Sun Nov 07, 2010 6:47 pm
by Valar
Good point however for some reason manufacturer recomends high strength lock tight on threads over night? Perhaps they feel even the slightest shift say a tenth of a thousandth can effect accuracy? I will try and find out. But they recomend installing and letting loctite sit and cure overnight?
Re: Newbee build
Posted: Mon Nov 08, 2010 6:48 am
by bigcatdaddy
TX...
It appears to act as a third hand...as the inner barrel nut is torqued into the outer nut, it is almost a magic trick to hit the torque specification and keep all the gas tube holes aligned....between recveiver, outer nut, inner retaining nut. Reality...took me about 5 tries, so it was somewhat difficult, but no where near impossible. Patience is your friend.
Perhaps an issue specific to free float fore-ends, or just this VP product? When finally done, it is indeed a sweet piece...
Re: Newbee build
Posted: Mon Nov 08, 2010 2:11 pm
by bigcatdaddy
So no specific pics of the lower. It seems they're all put together the same.
pros
...the Yankee Hill lower is sweet, tight, well machined. Everything fit as advertised.
...the amount of "slop" between this lower and my A3 DPMS lower is almost nonperceptible to this neewb.
cons
...I really struggled with the hammer installation and in getting both holes for the pin to align with the receiver holes. I wonder if a "slave pin" here would have been helpful? Perhaps this was only specific to my custom trigger?
...I had to re-read the instructions about 3-4 times to understand trigger an d hammer spring alignments and orientations. When I opened my Gissele...their instructions and pics were MUCH more easy to understand.
...The DPMS lower kit really has no instructions...there is a parts list and a schematic. But if you are a neewb...you most likely will need to go to Youtube or othere source. The pins and springs are just together in one bag without identification, you need to figure out what they are. And as many of you know, alot of the parts look alike to the uninitiated.
In the end, she fires and chambers factory ammo easily.
Considering a piece of glass, Vortex, looking for a 20-30X adjustable scope. I have a date with the new build at my range within the next two weeks. I suspect I'll start with Hornady factory ammo, then start my own load development.
Will post a few pics of the build here in the next couple weeks. If she satisfies...and is a "keeper", will need to pick up a ground mat for the cactii and a bipod. All of a sudden, next springs PD shoot is looking to be more fun!
All of a sudden I have a wild hare to replace all my other bolt guns with AR platforms!
Re: Newbee build
Posted: Mon Nov 08, 2010 4:54 pm
by Valar
Wow 20 -,30x is allot of magnification. I spose it depends what distance you are shooting. I have a Leupold 6.5x20x50mm on my 22-250 I coyote hunt and do some targer shooting. However, When coyote hunting I have found it faster to get on target with the scope down to 12 x or even lower. For this reason I went with a 4-12x scope on my ar build as it to will be primarily for yotes. What are you shooting?